Fargo rose tutorial for Susan
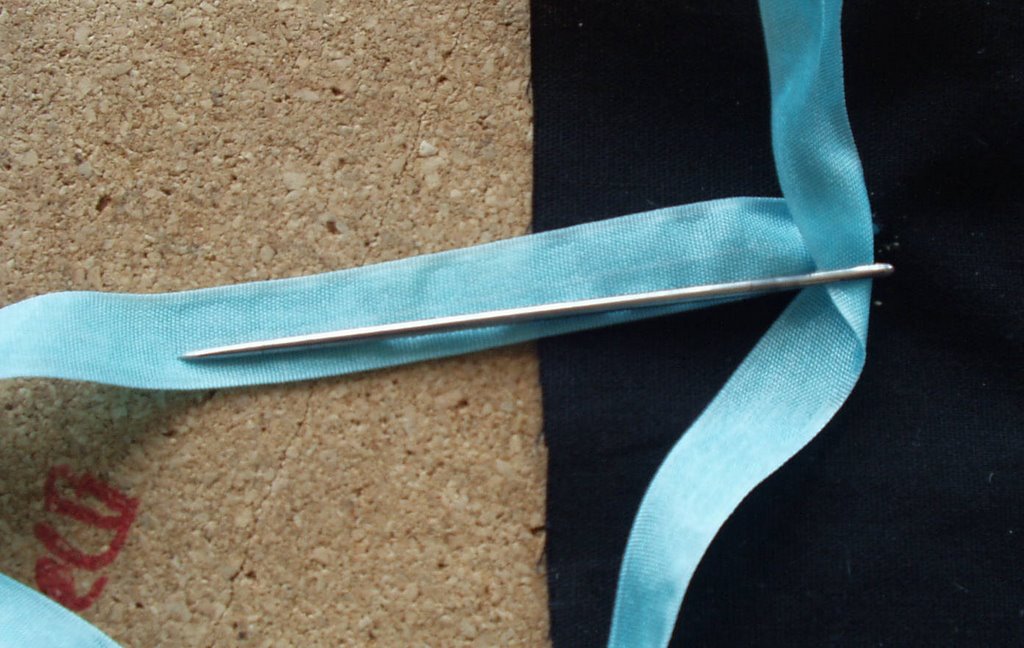 Bring the needle thru to the front of the fabric. I measure where I will place my knot by the length of the needle, but you can make it as long or as short as you like, but I do think they need 4 to 5 petals (wraps) to look good....read on.
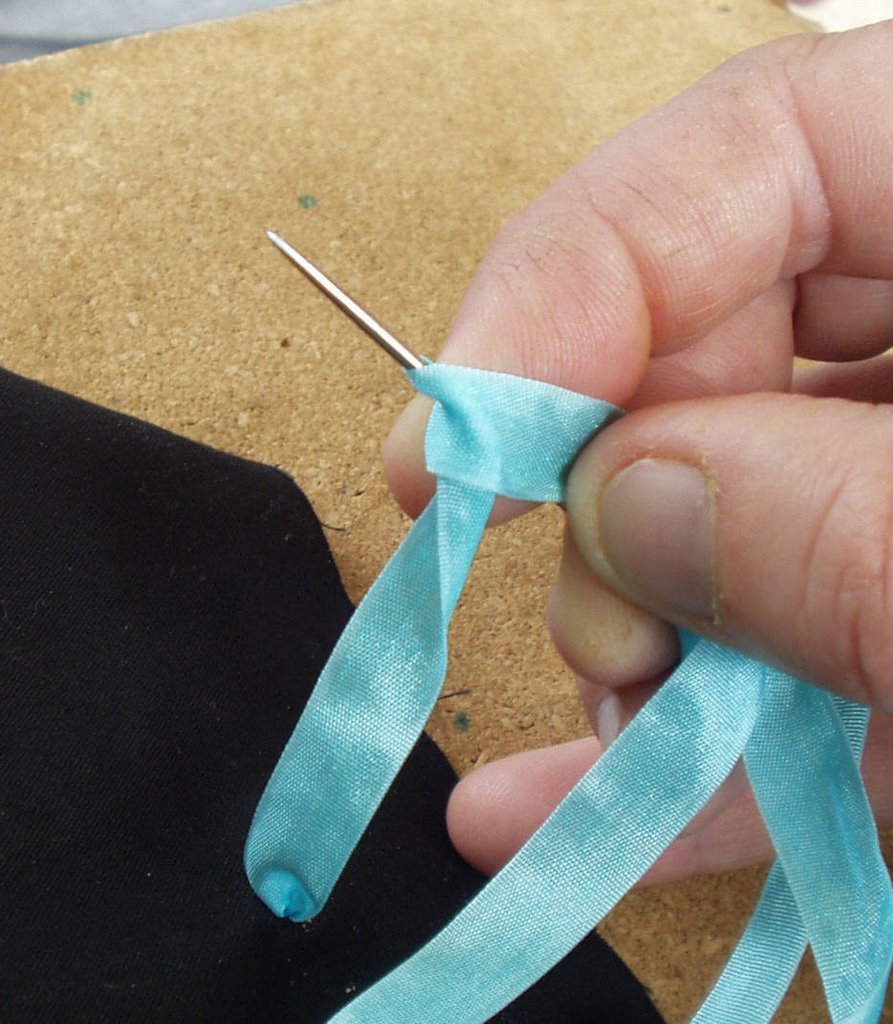 wrap the ribbon once around the needle, the same as a french knot. The tail of the ribbon , that is under my thumb (just the way I like it LOL) stays there for the whole process. It keeps the knot secure.
 Take the needle thru the ribbon about 1 cm approx ( just under 1/2 inch). You can make the distance as much as you like, it will give you larger, loopier petals. I recommend that you try to keep the distance consistant, whatever you decide. Starting smaller and getting bigger didn't really work for me. Unless you are doing about a foot of wraps, the rose looks a little lopsided. (my other hand would be holding the bottom of the ribbon taut, but I had to let go to take pic! Sorry to state the obvious, but you might mistake me for some freaky one handed fargo rose genius)
 Your needle is now at the 'back' of the ribbon. I like to wrap the ribbon under, bringing the needle back to the front, then take it back thru to the back. I like the wrapped look, but you can do them with just a running stitch down the ribbon toward the fabric. Again, try to keep the distance even.
 This is the start of the third wrap. I take the needle thru the middle of the ribbon, but play around and see what effects you get if you put it closer to one side than the other.
 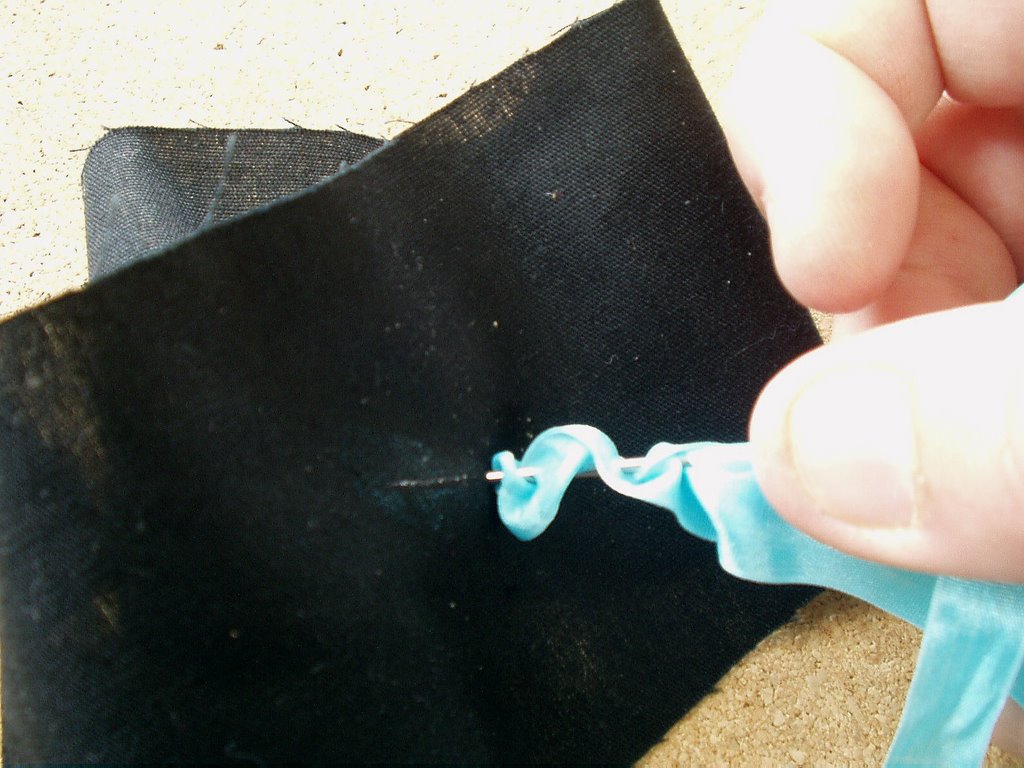 Here the needle is going back down thru the fabric. I have taken the needle back thru the ribbon one last time , close to the fabric, if I don't do this, I find one petal is always much longer than the rest, so that works for me. My thumb is still holding that tail......all thats about to change....
 Here I have changed the thumb I secure the tail with... so I have my hand available to go under the fabric. Don't pull the knot too tight yet. Once your needle is thru all the ribbon and fabric, but before you pull it tight, give a little tug on that tail, that will tighten up the knot and give you a nice centre
 Here I have tugged the tail and am securing it again, and am pulling the needle thru tight....it's all about to happen.....
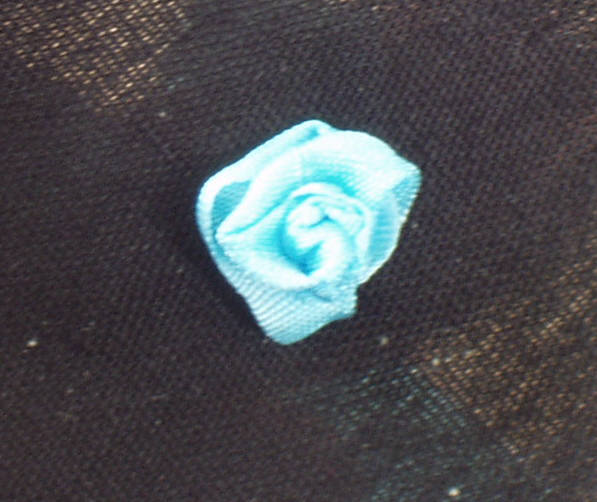 WOOHOO, you have a fargo rose. It does take practise, so get off the computer and go do twenty in a row. I must say that this one turned out even better than usually, which is always preferable when trying to teach something. You may have to twist the rose a little to place the petals evenly, and I will sometimes secure with a hidden stitch (thread not ribbon) to stop it untwisting.
I hope this is helpful, if you have any questions, please comment, any suggested improvements, please comment, heck just comment, cos that makes me feel good.


19 comments:
Thank you so much, Jo. This was so clear. I could see the things I didn't do - like having that one petal longer than the others, because I didn't pull the tail! I will try at least 20 of them and let you know tomorrow how it went.
I love your blog and your fargo rose instructions are wonderful. I'm gonna do it soon! Your blog name is similar to one of my dh's comments about life... "Wherever you go... there you-are"
bless ya'
Linda C
Ok! I commented!
Great tutorial Jo...the pics explain it perfectly..
Ohh never thought of wrapping the ribbon around the needle as you work down it (does that makes sense I wonder...lol) I generally just take stitches straight down the ribbon. Must try it soon. Lovely tutorial Jo - well done.
Catherine, I cannot take credit for the needle wrapping, that was something I read somewhere ( probably Julias Blog!), but it does give a great look the the rose.
Thanks for commenting Julia, I Know you read, but it's nice to see you drop in every now and then
ooh something new for me to try!
Thank you so much Jo, you are a very kind person, sharing this with us.
Thank for the tutorial, Jo. I have been freaky scared to try any silk ribbon work. Especially flowers. I'll put this in my 'to do' pile and give it a shot in the new year.
I am printing this one out. Then I can go sit in my cozy place and see if I can pull this off..I l just tried ribbon embroidery last night and I could kick myself for waiting..I love the way it looks..I just did a spider rose and a lazy dazy but they looked almost good..lol
Eve
Lovely tutorial Jo. I have never done any ribbon work. Thanks. I'm sure you have set me off on yet another track!
Thanks Jo! I've tried doing these before but they never looked 'right'. Your hints will be really helpful!
Mary Anne
Jo, I wish I could take credit for the needle wrapping, but it was not me...
Great idea, and I love your roses..
off to try it!
Thanks so much Jo - never had thought of the 'wrapping', and my Fargo roses never look like much! Now I'm really inspired - great tutorial, with wonderfully clear pictures. Thanks to Sharon B also for linking to this on her blog.
Clairee
Great tutorial and thanks for sharing it with us. I also use a colonial knot with this and it works as well. =)
Lillian
Thanks for all the comments guys. Gee, I only had to ask.....
Wow, this little rose has a lot of names! :-) I call them sweetheart roses or French Knot-Running Stitch roses. The tutorial was great. I used many hundreds of these roses on the straps of my art bra submission. LOL
Thank you, googled Fargo rose and this is where it took me, I'm going to try it just now,
Helina in Finland
wow, that is great, Jo.
do you give lessons in person?
i'll read thru this again with needle and ribbon and see if i can do it. i've never done a rose before so i wont hold my breath.
just happened upon your blog the other day and was wow'd with your origami bag too. missed this tutorial first time around. i think the summer heat is fogging up my brain. :))
cheers from bhb,
jeanne
Brilliant! Thanks so much!
Post a Comment