Felt Snowflake Ornies - partie deux
Part II of this tutorial for you. Part I can be found here.
These have been so much fun to design and stitch. Have knocked out the 13 family ornies this week, and will start working on friends. So, here is how to complete your snowflake ornaments.
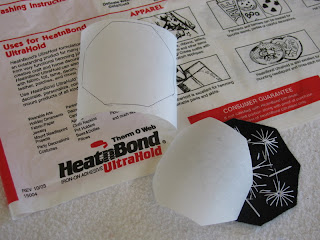
You will need some kind of fusible, double-sided interfacing (adhesive medium). Use your original template to cut out as many as you need. I cut mine well inside the line (2mm), so they are slightly smaller than your stitched front. I like HeatnBond. I use it for my postcards to. When it cools it is really sturdy and stiff, great for this kind of thing. I have no experience of anything else, so can't do comparisons. From my knowledge of vlsioflex (sp) that is a far more softer finish for adding applique to quilts, so I am sure it would still work, but your ornie may curl or bend with time. With the Heatnbond I would expect an ornie that will sit and hang nicely for years to come.
Iron your fusible on. I ironed mine to the front. I have beads and sequins on the front and didn't want to give them to much "iron time + it will be easier to line up the names I stitched on the backs later (totally optional, so may not be an issue for you)
Here are all my fronts ready to go. I also used baking paper when ironing this on, just to protect the iron.
Peel off the backing....
I added in a hanging loop at this point (actually, the pic shows it added in under the first layer of fusiable webbing. Either way is fine.) This is where lining up the back was important to me. I wanted to make sure the loop was at the top of the name. How the front sits does not really matter as they are all symmetrical.
So put your hanging loop in - I had hoped for something a little fancier, but this worked. I did try knotting the cord, but it didn't sit right, and this did. Place your back on, the right way up if necessary. Put your pressing cloth/baking paper down over everything, including the loop cording (you never know how it will react to heat), and press until the webbing has taken.
And Wa la! Finished. I had quite a little production line going.
You may find that the front is a little smaller due to the stitching (like the top ornie in the pic below). or your template is not 100% symmetrical, and the lining up is a little off. The beauty of felt is that you just trim it up all neat and tidy.
Have fun. And do let me know if you make any ornies. I would love to see them.
I bought some great metallic thread on the weekend, so I am doing the next lot with those. I could of finished these ones with it, but seeing as they are all for family, there would of been raised eyebrows about why they got sparkles and I didn't....


6 comments:
These look superb! Thanks for the step by step, it's great :)
The Felt ornies are darling!
I want to make some now-
Thanks, Tina
Hi, your works are beautiful, warm greetings, Wanda
Hi, Jo! I love these little ornaments! And the step-by-step tutorial is great!
You're so very far ahead of me when it comes to Christmas stuff. I haven't done one lick of preparation for gifts. I'm thinking... I'm thinking.... it's not gonna happen....
Hope you're well!
MC
These are nice! I'll bet they're equally as addicting!
http://piecefulmusings.blogspot.com
Your work is wonderful and I love the ornaments. Thanks for the tutorial. I think these might be the start of a new family tradition as I have my first two grandchildren due in a few months and can see making them an ornament every year. Thanks again and I love your blog. I check it often.
Post a Comment